Quesadilla: the RV's easiest lunch

Quesadilla (pronounced phonetically as Kay-ser-dee-yah) is the fancy name for something I have been calling toasted wraps for years. A true quesadilla is a toasted tortilla with melted cheese inside. But in addition to cheese, you can put practically anything in a quesadilla. My favorites are ham (or salami), mushrooms, tomatoes, capsicum, onions and cheese of course. I don’t cook these ingredients first, but it really is a matter of taste. The filled tortilla is then toasted on a frypan or BBQ plate until the cheese is melted. I tend to just fold the tortilla in half, Rob prefers to fold the bottom up and then the two sides in.

Here are 3 recipes we love:

South Western

  1. soft tortilla wraps
  2. triple smoked ham
  3. slices of sun dried tomatoes chopped
  4. Roasted capsicum chopped
  5. a slice of red onion separated
  6. basil and oregano
  7. grated cheese
  8. South West Dressing (Mayo and taco seasoning)
Place the meat, cheese and vegetables on half of a soft tortilla. Fold in half and cook by preheating a fry pan on medium heat and spray with light olive oil if necessary. Cook 2 minutes each side until toasted or heated through.

Chicken Delight

  1. soft tortilla wraps
  2. BBQ chicken breast
  3. spring onion
  4. grated cheese
  5. avocado
  6. corn kernels
  7. tomato salsa
  8. mayonnaise

Place the meat, cheese and vegetables on half of a soft tortilla. Fold in half and cook by preheating a fry pan on medium heat and spray with light olive oil if necessary. Cook 2 minutes each side until toasted or heated through.

Salmon Surprise

  1. soft tortilla wraps
  2. can of pink salmon
  3. 3/4 cup mayonnaise
  4. 1 small apple grated
  5. 1 1/2 cups of grated cheese

Combine all ingredients except for the tortilla. Spread thickly onto half a tortilla. Fold in half and cook on fry pan, turn when first side is lightly golden brown, approx 2 minutes each side. Cook until second side is golden brown and cheese warm and melted. Serve immediately.

Great for visitors

I find that quesadillas are a terrific light lunch when friends come around to share some food. I like to let my friends mix and match from a variety of meats and ingredients that I have already prepared and presented in bowls so they can build their own yummy cheesy parcels.
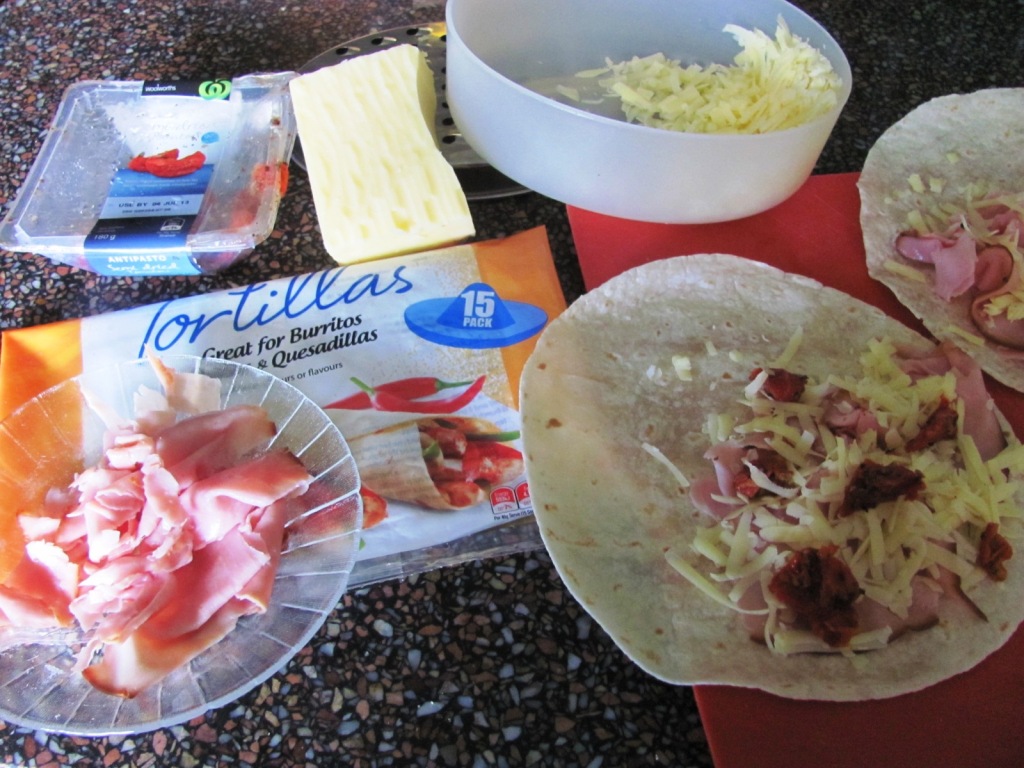
 

HINTS


Many ingredients can be kept in the pantry when you are on the road a long way from a shop or have unexpected guests. I prefer fresh meat & vegetables but that is not always practical when travelling on the road.

  • Tortilla breads keep for a long time in un-opened packets
  • Kraft Cheddar Cheese can be found near the jams and condiments and don't need refrigeration until opened.
  • Vegetables such as sun-dried tomatoes and roasted capsicums are easily available in jars
  • Tinned vegetables such as corn, tomatoes and mushrooms
  • Prepared salsas add vegetables and come in a nice variety too
  • Tinned Ham - not my personal favourite way to have ham
  • Tuna is a good meat substitute that keeps well in the pantry

Wonderful Children of today

Children are one of the greatest gifts in life. We need to do what we can to encourage them and build their self-esteem. I love hearing stories of hope and inspiration of our young kids & youth.
Frequently in today's society we hear lots of negatives about the children of today. Well just recently I have been impressed with comments made about 2 children whom I know personally. I was so touched by them that I knew I wanted to share it with my readers here.

Photo: Gilzee/Flickr

The first is of a young boy, maybe 7 years old who regularly writes to the prayer team in our church, to encourage them to pray for someone that he knows or has heard about. It is nearly always a prayer for some other person, rarely ever for himself or his family. (I don't know any other detail of his prayers as they are always private and confidential). I only know this much because I noticed that one of the ladies was posting him a card of some sort that she has me to put in the post since I was going that way anyway. I noticed recognized the name and made a comment to her. She mentioned that this child writes in regularly and that always his prayers are for others! I found that both encouraging and remarkable for such a young child.

The 2nd is a child who is about to celebrate his 10th birthday. Instead of birthday gifts, he asked for donations to the group My charity water, specifically for water for an under privileged village when  he found out that many people didn't have access to clean, safe water.

Photo: Cherry Mortgages


We hear so many negatives in the media and such. So it is fantastic to hear the opposite is true many, many times. So let's publish and gossip great stories such as these, that encourage and inspire all of us!

These kids have made an impressive mark on me. When we can see the development of such characters we should encourage and applaud them and their actions.

It can only take one person to make a difference in this world and that can be a wonderful child too! I see much hope in the future when I hear of such children as these.

Installing Solar Panels on our RV

The main purpose for converting the bus is so that we can free camp (boondock), while we travel around Australia, thus we needed to seriously look at alternative power sources amongst other considerations. We really don't want generators as they are smelly,  noisy and bothersome for neighbours as well as ourselves. Thank God for the invention of solar power which has possibly been the single greatest impact on the RV community in the last 20 years if not more. The benefits of solar power are many. Maybe in a later post, I will go into more details of why you should go solar, but for now I am just going to show you a bit of how we set up the solar panels on our bus.


Do it yourself

As with just about most aspects of our bus to motorhome conversion, Rob is handling the installation himself. With careful research and internet crawling, we saved hundreds of dollars. Solar packages, esp for the RV markets can be rather expensive, yet they are no better than standard units and with a little be of knowledge and practical application, it can be handled by the handyman or woman.


How many units?

After installing the vents, antenna and skylights and then painting the roof, we wanted to cover as much of the roof as is possible with solar panels. Why waste any area? Rob also decided to lay the water pipes down first. They are not going to heat up very efficiently, but the residual heat from the solar panels will take the edge off the water temperature and thus reduce the amount of  'proper' heating the hot water will need.

See the water panels underneath the panels

After working out our roof area and the best size panels that would fit, we went ahead with the purchase of 32 monocrystalline panels of 40watts each. We'll have 1280 watts  with max 80 amps. This will allow us stay out without mains power for as long as we like, even with a week of wet weather.
A question of price? The 32 panels (1280watts) at $45 per unit (July 2013) were cheaper than the 3 larger panels we bought about 4 or 5 years ago which only supplied 240 watts.  
Why so many? It may seem like overkill but look at it this way, we have the room up on the roof and this way we will still have more power on a week of overcast days with so many panels.
Where do I get them? We bought ours ebay via OzPlaza.  They did not accept a lower price offer since we were buying so many, however once we decided to purchase anyway, they were fast and efficient. Even when one of the panels sent were faulty, they quickly replaced it free of charge including shipping. We would deal with them again and thus can recommend them (and before you think of it, we are NOT getting any benefits from them for stating such!)

Small solar panels v larger units

We decided to purchase small panels  and join them together for 2 main reasons:
  1. We can can a better roof coverage with smaller panels (roof area is valuable real estate so we want to use as much as possible) 
  2. We will not lose as much solar input if some shade were to fall on even part of a panel. Research taught us that smaller panels are more efficient in partial shady conditions. For example, if the shade of an antenna falls across a panel, then that panel's maximum input is reduced by half. So if we have one 120 watts panel and some shade falls across a corner of it, then it's input is reduced by half to 60 watts. Whereas if we have three 40watt panels affected by the same shade but the shade only falls on one panel then only that panel is reduced to half, producing 20 watts and the other two panels' input is not affected thus producing 40 watts each. This way we will still be getting 100 watts in partial shade compared to the 60 if it were just the one larger panel.
Rope used to secure panels whilst silastic adhesive drys

Assembling the sets of solar panels

Rob assembled the panels: wired them in parallel into sets of 3 (to go across roof) on the work bench for ease rather than do it all up on the roof. (3 x 40watts = 120watts) to the shape of the roof. He joined the panels with aluminum T sections. These sections are then fitted together and then will be wired into the control box separately.


The 30 panels equals ten sections - equals ten cables. Once again it might seem like an overkill, but this way, because of our 24volts, every second section is joined together which equals 5 panels at 12 volt each joined together to make 24 volts.

wiring of the solar panels

Coupling the wires
See the air gap under the solar panels for air flow

Sides finished off to look neat - holes for ventilation
We chose to use lithium batteries as our power storage units. They are lighter weight and much more efficient.

Ceramic Painting the RV Roof

I have a bit of catching up to do, especially after being so sick with the flu for 3 weeks and not really keeping you up to date with the bus conversion. Things seem to be coming together nicely at the moment. The bus is really moving along.

Preparing the roof for painting

Rob has been busy painting the roof. He has decided to paint a white reflective Barrier Paint on the roof. This ceramic paint is not only to protect the roof but it has properties that help with heat insulation and sound deadening. The main idea behind it, is to enable us to stay cooler in summer and warmer in the winter.

Preparing the roof.

It is an old bus and he needs to scrape off any loose, peeling, blistering, chipping, cracking or flaking paint. Mostly he has done this by power sanding though obviously some parts have had to be done be tedious but necessary hand work. It took him many hours over 3 or 4 days. Thankfully there was no issue with mould.

Priming the roof

Next he applied the primer coats and then the multiple layers of the ceramic paint.

On his knees painting

Painting the roof

He applied 4 coats of the ceramic barrier paint using a roller. Applying the paint on generously, ensuring that the paint is worked into any pores and cracks. Rob tried to apply the paint as smoothly as possible. Each layer of paint has to have a 24 hour curing time and no moisture is to be present, so we had to hope for the best as far as rain goes. We had the protection of the tarp if the rain were to occur, which it did after we had finished for the day on about day 3. We do not have an issue with frost in our area, but being a mild winter, we were encountering heavy dew condensation almost every morning.

The beautiful paint job

Sealing

After the final curing, then Rob started on the sealing coats which not only helps seal the paint but also acts as a waterproof coating. Since he had some of this paint left in the tin after the 2 recommended coats and the paint will only keep for 12 month before going 'off', he decided to keep painting until all the paint was used up. This ended up being 4 layers of the Top Coat. The general theory is that the more layers, the better the insulating capacity.

Hard Graft

This work is not for the weak kneed (literally), those with Acrophobia or those that like a firm solid flat surface under their feet. Climbing up and down the ladder several times a day really got the leg muscles & heart working. Painting at a moderate height was bad enough but add to that the slight slope at the edge of the roof with no scaffolding or protection was a bit unnerving. Being constantly down on your knees is tough on any body, let alone one in his early 60's. Oh... Rob's poor knees! I think being 6'4 doesn't help, he has a longer way to get down and more legs to bend and fold underneath him!


A handy tip.

Rob found it hard to determine where he was upto after the first couple of layers and so he added a touch of blue acrylic paint to the barrier paint so that the difference in shades though very slight was enough for him to see where had been and where he still needed to paint.

It's is finished

Oh well, that's the painting  part done, next is the installation of
32 solar panels!!!


So while we say Happy Travels to many friends who are hitting the road,
we can only dream of our next trip whilst we keep on with the bus conversion.

Stop and enjoy your surroundings


Sometimes we need to remind ourselves to stop and enjoy the moment we are in, whether weare at home or on the road. This is just another take on "Stop and smell the roses". Well it is winter here in Australia, so no roses. However our wonderful eucalyptus trees in our forest have a unique scent and are there for all to enjoy no matter what the weather is.

So do it... get out there and take time to go for a walk, and just enjoy being alive. I always feel closer to God when I am outdoors - out in the nature that He created.

Roast Vegetable Frittata

Frittatas are just a fancy name for a savoury omelette. I just love frittatas, especially when I have already cooked extra vegetables with a baked dinner a night or 2 beforehand. This one is so simple and tasty.


Frittatas are ideal for meals in the RV when  travelling. If the veggies are already cooked then preparation is so quick and simple. It cooks in 30 minutes, it is tasty, filling, yummy AND also it is a one 'pot' dinner so other than a knife and a cutting board there are no more dirty dishes to wash other than the frypan.  You truly can't get a dinner much better than a frittata.

Don't restrict yourself to my recipe. You can use any left over veges and bang in a few extras if you don't have left overs. It will still taste good. You may remember that I have a salmon and pea frittata that I wrote up a while back. Click here for that recipe.

So enough rambling on, here is my recipe as a guideline for you!

Roast Vegetable Frittata


2 tablespoon oil
2 onions finely chopped
8 rashes of short cut bacon chopped
1 cup of baked potatoes
2 cups of baked pumpkin
1 cup of baked sweet potatoes
2 baked carrots
½ capsicum finely chopped
1 small zucchini grated
6 eggs
1 cup milk
3 tablespoon of plain flour
Pinch of Italian Mixed herbs
A good shake of seasoned salt
pinch of pepper
1 cup of grated cheese

Fry bacon and onion in a little oil in large frypan.
Add chopped baked vegetables and spread over pan evenly.
Add capsicum and zucchini
Season with herbs & seasonings.
Whisk eggs, milk & flour together and then pour over vegetables.
Sprinkle top with a little grated cheese.
Place lid on and cook over med low heat until top is just set which takes approx 30 minutes.

The frittata all ready for the sprinkling of cheese before putting the lid on and cooking

If desired, you can flip the frittata to shorten the cooking time but I found I could only sometimes flip it successfully. Maybe I just need more practice. Dunno. I am lazy and much rather just cook it a tad bit longer. You could also heat set the top with a torch gun or heat gun.


Cut it into serving portions and plate it up.

It makes enough for 4 people without any salad fillers and will certainly go a lot further if you do add something on the side.

I would love to try more recipes. Drop me a link or put the recipe in the comments

I need to grow a thicker hide

That's it! I have the proof of the pudding! I am allergic to staying home over winter.


As Rob is converting a bus into a motorhome, we are destined to spend the bulk of this winter at home. And the result is both of us have contracted colds for the first time in years. I am so weak that I couldn't keep anything in for 3 days. Good news is that I have lost weight, bad news is that most of it is fluid and will come back quickly. The lack of energy is most definitely not welcome.


It has worked out extremely well for our family that we are home this winter as our eldest son & his family have had to move back from interstate at short notice. By staying with us, it gives them more time to find a house that they would be happy to buy rather than just taking the first place that comes up near their work.  As it worked out, they fell in love with the first house they went to and bought it straight away, so they were only with us for weeks instead of months. Also soon after they came back, our daughter in law had a conference to attend in New York and they wanted to take advantage of the trip and extend it to make it into a second honeymoon by leaving the two sweetest grand daughters with us for the duration.

The girls aw Wollongong Botanic Gardens

We did have a cruise around the Pacific Islands of Vanuatu, Mystery Island, Li Fou and Noumea planed which was fabulous to escape the start of the cold weather, the weather was fantastic. I only started getting sick after the trip.


Still I mustn't complain, it has been a relatively mild winter and I only have a temporary illness, nothing major if with a constant blocked nose. Apparently I have nasal polyps which may need to be surgically removed...but there's a 4 month wait just to see the specialist let alone get a surgery date! Oh it could be much, much worst.

I will just yearn for the warmer weather and watch my friends go off chasing the warmer sun elsewhere...our turn to hit the road will come again soon.

So tell me where you are this winter?


Eternity

If you grew up in Sydney, then you would have heard of the story of Arthur Stace and that he wrote the word "Eternity" in perfect Copperplate hand writing back in the 1940's and 1950's.


Some 'experts' reckon that Stace wrote this word in chalk some hundreds of thousands of times, some even estimated it could have be written 500,000 times. The chalked word was an enigma that gave rise to thought, consideration and talk. This one word became a powerful message and a sermon.

In more recent times in it indelibly imprinted on December 31st 1999 to midnight on 1st January 2000 when it was lit up on the Sydney Harbour Bridge for all of Sydney, Australia and indeed it was beamed across the world and seen by  millions of viewers as part of the New Year's Eve celebration marking the turn of the new millennium


You need to consider just where it is you intend to spend eternity.
http://www.biblesociety.org.au/news/michael-jensen-on-a-moment-of-eternity.

Half a million times, Arthur Stace bent down and wrote that word “Eternity” on the footpaths of Sydney. And it made a difference. It made a difference to many generations. We wont really know just how much difference that one word drawn in chalk has made until we are in heaven.

A permanent plaque found on the ground outside Sydney's Town Hall

So take a moment and think about Eternity and where are you going to spend it.
Will it be with Jesus or without Him?


Make your life count for Eternity.

The shower ensuite in progress

Another gorgeous sunny winter's day today, but unfortunately it is coming to an end with a cold wind coming straight off the snow fields. Still we can't complain really as it has been a mild winter so far and we are already more than half way through.

Rob did some work on the tiny shower ensuite. It is certainly not finished yet. I just thought I would write and let you know of the progress we are making here.

We deliberately designed a small bathroom, though Rob had hoped for a much larger one originally. It is an all in one shower/bathroom, as when it comes down to it, you really only spend a few minutes a couple of times a day in this little room.

You might remember that Rob made his own mould and fibreglassed a custom fitted shower to fit in the bus. As with many new things, it did not go smoothly. The release agent did not release and this has required a lot of very boring and difficult sanding which is still not completed. You can read more about his trials and tribulations with it here.


Regardless Rob has pressed on and installed the shower into the bus through the hole in the wall in which one of the slide outs is going to be installed.

Ensuite just installed through the bus side wall.


He has fitted the adjustable sliding shower head rail and hand tap in. To conserve space, it is over the sink as you can see here. It also keeps the water plumbing on the one side of the wall.

Rob has installed 2 hand rails to also double as an aid as we have to admit we are not getting any younger! I couldn't get back far enough to get the whole of the sliding shower unit in the photo!


A little window for some natural light as well as ventilation has also been cut in. The plumbing is incomplete at this stage.

A little window for some natural light and ventilation.


We wont be winning any awards for bathroom designs as we kept it purely functional and spartan. Being a wet environment, one is limited with designs. maybe one day I can paint it or utilize some pretty vinyl stickers. It is not exactly finished yet... so who knows just where we end up.

Lamb Casserole

I just love winters for the vast opportunities to cook soups and casseroles. This week I cooked a lamb casserole I adapted a recipe from 2013 August's Super Food Magazine in my Dream Pot. Rob wants me to repeat it... he loves it.
The meat was oh so tender!

However I can't leave a recipe alone and made not just one or 2 changes, so basically I have come up with my own version using their recipe as a starting point and inspiration.

My lamb casserole


This was quite filling and though the magazine says it serves 4, yet I reckon you can easily feed 6 people very generously!

Shelly's Lamb Casserole

Ingredients

1 teaspoon olive oil
1 kg lamb chops
1 large onion diced
3 garlic cloves sliced & chopped fine
410g tinned tomatoes
2 tablespoon tomato paste
2 tablespoon Worcestershire sauce
1 cup beef stock (I made it using beef stock cube & water)
1/2 teaspoon dried thyme
1/4 teaspoon rosemary
2 cups chopped cauliflower
1/4 cup peas
1 stick of celery diced very fine
100g mushrooms diced
2 large carrots sliced.
salt & pepper to taste

Method 

Heat oil and brown meat in frypan.  Add onion and garlic. Cook until onion is cooked. Add all the rest of the ingredients. Place lid on frypan and simmer gently for an hour. Top up fluid with water as needed if reducing too far and turn heat down a bit.
Boil water and heat both inner pots. Tip water out of larger pot and transfer simmering meat into HOT large inner pot.
Transfer larger pot into the insulating chamber of the Dream Pot.
Place smaller pot with boiling water still in it in the top of larger pot and place the inner lid on
Close the Dream Pot and set aside for minimum 5 hours, preferably 6-8 hours to allow it to keep on cooking in the residual heat.

I served it with boiled cabbage and mashed potatoes which I cooked independently. (I had intended to cook the cabbage in the smaller pot for the last 40 minutes, but I got carried away doing some sewing and forgot about it, so I zapped it in the microwave instead!)


Spicy Lamb Shanks
I have to say that I still prefer my Spicy Lamb Shanks which I did a month back. You can find the recipe here!

Try both and let me know which is your favourite. Or maybe you have a recipe I should try! Post it or a link to it in the comments! I would love to try some more recipes, even if it hasn't been adapted for a thermal cooker such as a Dream Pot, I reckon I could work it out!